I love eggs, boiled, poached, fried, scrambled and most definitely un-fertilised. So when the strobist food assignment came up, I immediately thought of eggs. Actually to tell the truth eggs are really just a condiment to have with bacon. OK I admit it, I actually thought of bacon first, but realised I wouldn't be able to hold off eating it long enough to photograph it. So eggs it had to be.
The funny thing about the strobist competition is that its about lighting but though lighting is very important in food photography, what really stands out is the styling, composition and choice of colours. I looked through my Contact Food and Drink Photographer books to get some inspiration and one of the things that struck me was that the photos that I liked the best had colours that linked the subject and the background. For instance Peter Cassidy on
page 28 picks a colour from the subject and uses it in the background. The rust colour in the pears, or the peach stone in the peaches

These contact sourcebooks are full of inspirational photos, and they are free to view online. I had lots of ideas about what I wanted to do but not really enough time. I'd have loved to have done some high end shots like the ones in the books but I didn't really have time, though it has to be said there are lots of very clean simple shots entered into the
strobist assignment that didn't take a lot of investment in backgrounds or ingredients.
I don't know when the idea for the eggs came to me. I was vaguely considering shooting a cooked breakast like Laurie Evans'
photo for M&S but TBH we don't have lots of photogenic food at home. I'd have had to go shopping. But then the egg idea came to me, and it meant I could just use stuff I had at home.
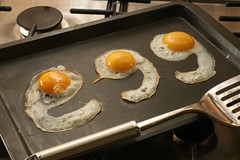
Styling the egg was quite difficult and required a fair amount of patience, most of the effort went into the styling. Egg yolk is a gel, its semi-solid, So you cant just crack an egg and then move the white into position. You could start cooking the egg and pull the uncooked yolk around, but I felt that it wouldn't look right. So what I did was to separate the egg white from the yolks by tipping the yolk from one half of the shell to the other. Then I took a small paint brush and painted the letters on the tray with egg white. Then I had to carefully spoon more egg white onto the painted portions to thicken it. Egg White likes to stick together, so the spooned egg white flowed around the letters. Once I had built up the thickness, I used the paintbrush to push the white out to round off the letters a little. With this done, the final step was to turn on the heat and place the egg yolks in position.
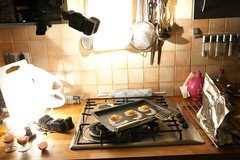
You have to work quickly once the eggs are cooked because they can quickly dry out. By the next morning they were all curled up. So I didn't spend a great deal of time perfecting the lighting. I would really have liked to have finessed the light a bit better, maybe had bigger highlights on the egg yolks, but it was getting quite late by this point. The cramped conditions would have made it difficult to set up umbrellas and softboxes, so I used white plastic chopping boards and reflected the light off of them. I used two small flashes one pointed at a chopping board behind the tray and the other on the left hand side. I also set up a small piece of foil on the right to add a little fill.
I don't expect this to win the assignment, but its generated a lot of interest. Last time I looked it was sixth on page one of explore, which is kind of nice. It was a lot o fun to do and I would like to do more food photography in the future.
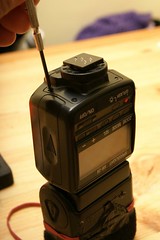
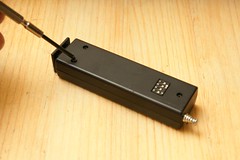
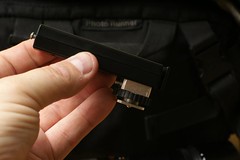 One of the weaknesses of the Phottix Strato triggers is that the shoe isn't a great fit and it doesn't lock, so I decided to use one that needed repairing, to experiment with a case modification. I found that Sonia do an excellent replacement hotshoe for the Vivitar 283/285. It has a PC sync socket and a test button and can be very easily be attached to any case that has room for a hot shoe. The strato trigger doesn't have enough room to replace the hotshoe that it comes with but with a little imagination the hotshoe can be placed on the front of the trigger so that it can be mounted horizontally.
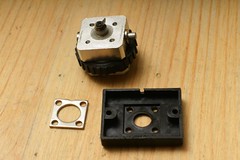 The first step is to disassemble the shoe. Remove the four screws and with a small amount of force the plastic mounting plate can be removed. You can see that the sonia shoe is more or less a solid block of metal. All the moving parts are hidden inside it.
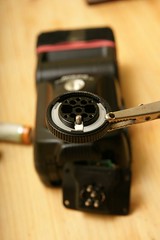
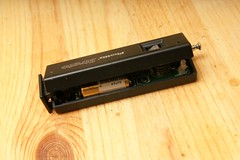
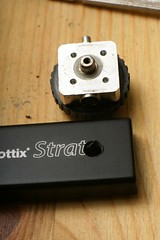 The next step is open the trigger up by removing the three screws. Don't worry about losing the little spring off the built-in shoe, you will be saying good-bye to that forever. Take the front cover and drill a hole in the "O" of the word Strato. Make it a little bigger than the centre post so you have some wiggle room.
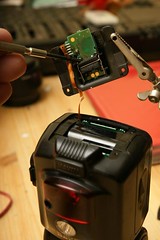
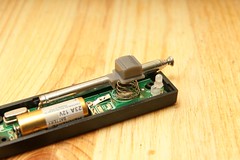
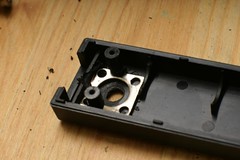 The next step is pretty nerve-racking. You will need to mount the square metal plate inside the housing, but the posts for the screws are in the way so you will need to undercut them. I used a dremmel too with a rotating disk. I slid the plate in and gave it a bit of a bash to make it sit flush.
 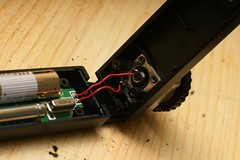 Once the plate is in place you can attach the hot-shoe with the four mounting screws and then solder the wires in place. It shouldn't make any real difference which is attached to which tab on the shoes, but ideally it should match the configuration on the original hot shoe.
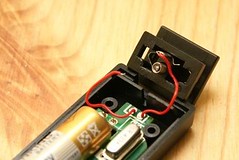

